Unity Shader
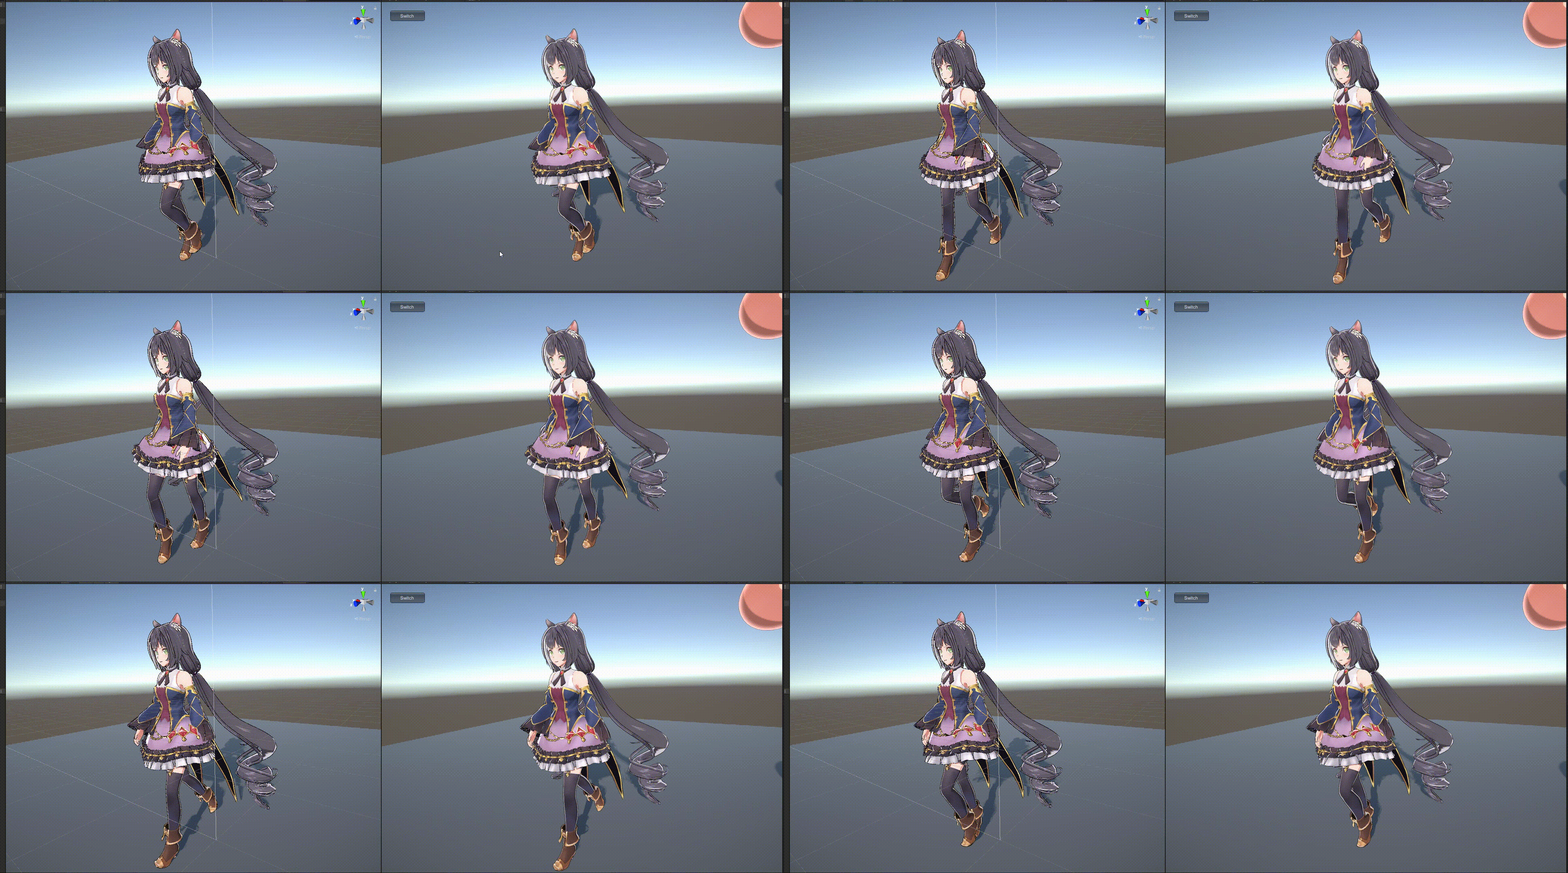
近段时间,断断续续的研究了很多Shader,和计算机图形学相关的内容,在上个月些出了自己的第一个稍微能用点的卡通着色器。 先说功能。
功能包括:
- 主纹理颜色
- 阴影颜色
- 阴影范围
- Ramp控制的阴影
- 阴影Smooth
- 阴影的边缘噪波位移(笔刷感)
- 头发基于位移贴图的各向异性高光
- NDC空间的外描边
- 菲涅尔
- 高光部分的Bloom大小
- 头发的投影
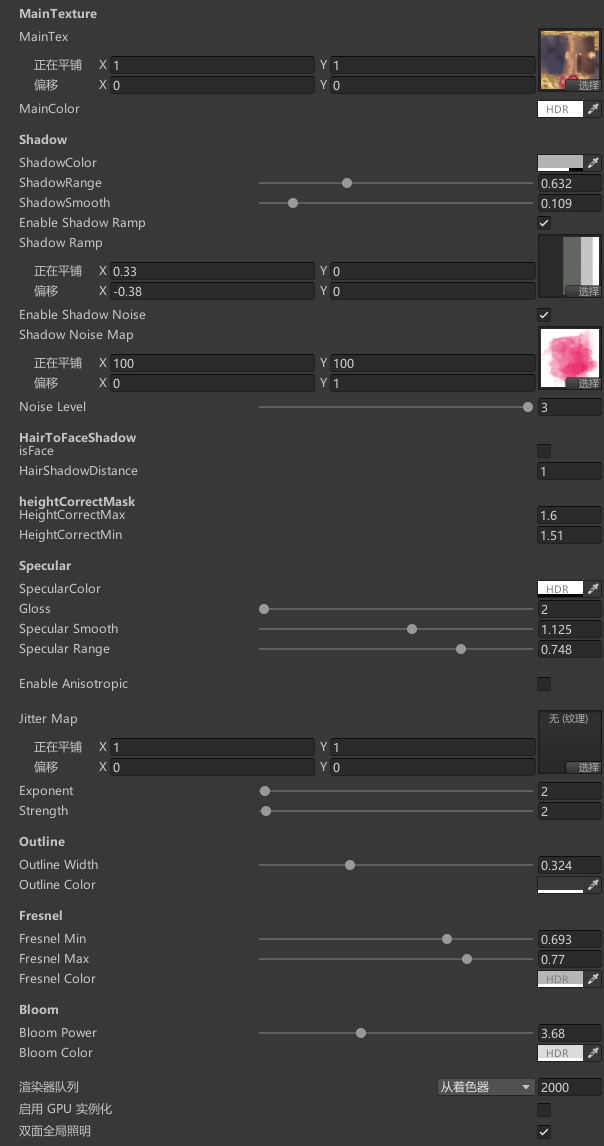
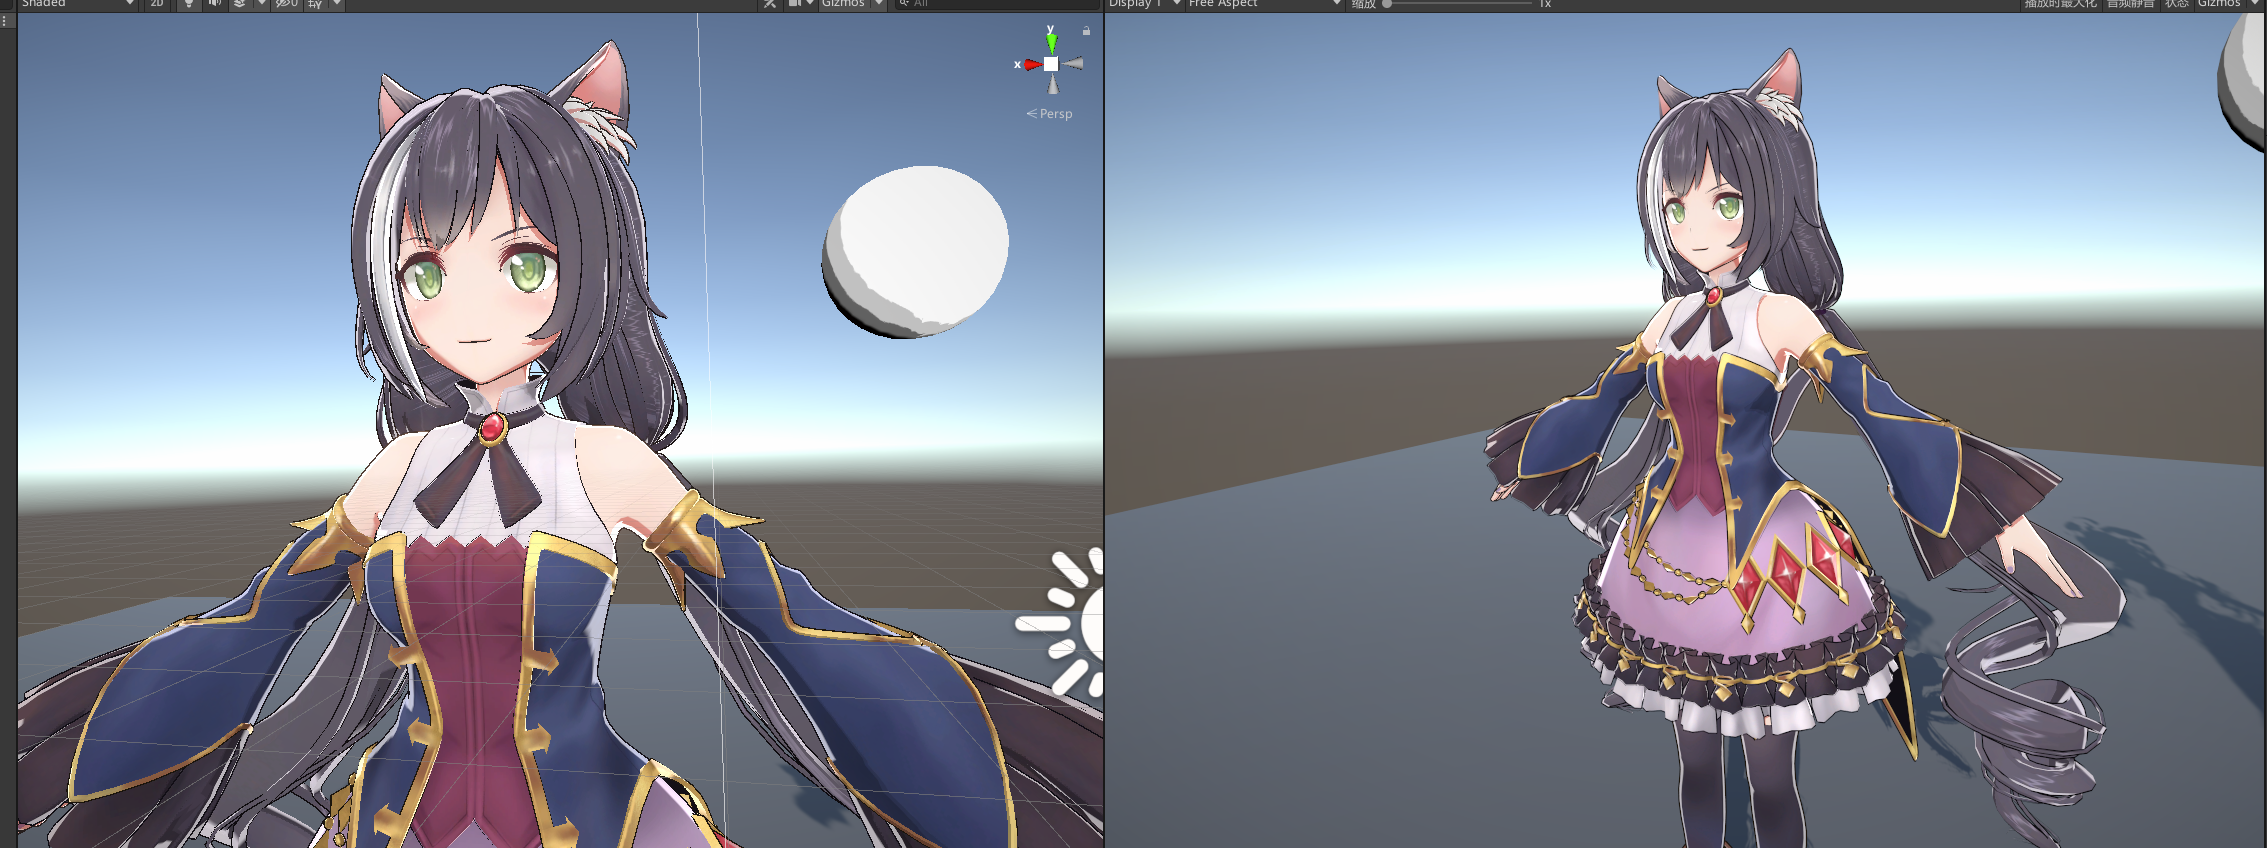
阴影
描述各个阴影的部分
硬阴影
先计算一个基本的halfLambert漫反射模型,再利用smoothstep函数把阴影边缘收缩。
float halfLambert = 0.5 * dot(worldNormal , lightDirWS) + 0.5;
float Lambert = smoothstep(0, _ShadowSmooth, halfLambert - _ShadowRange);
float FinalRamp = 1.0;
硬阴影的分级
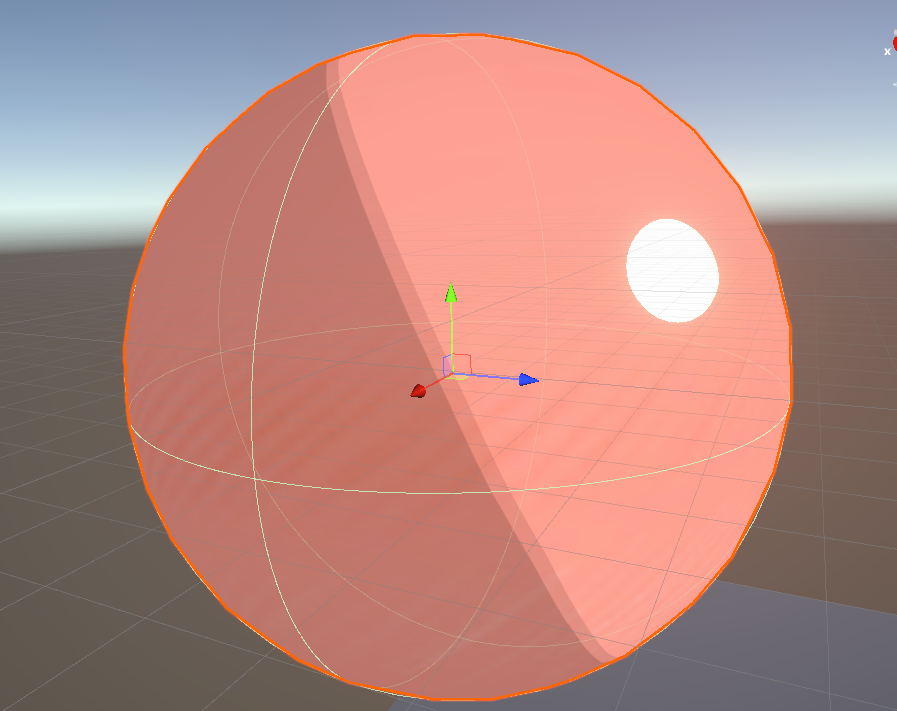
原理上是利用一张Ramp纹理来采样之前的Lambert计算出来的结果,就能按照灰度值,将颜色映射到阴影的对应位置上,阴影的边缘将取决 于Ramp的纹理样式。
float rampValue = Lambert;
float Ramp = SAMPLE_TEXTURE2D(_ShadowRamp, sampler_ShadowRamp, float2(saturate(rampValue),0.01) * _ShadowRamp_ST.xy + _ShadowRamp_ST.zw).x;//因为不知道为什么 要做一次偏移
FinalRamp = saturate(Ramp);
硬阴影的置换
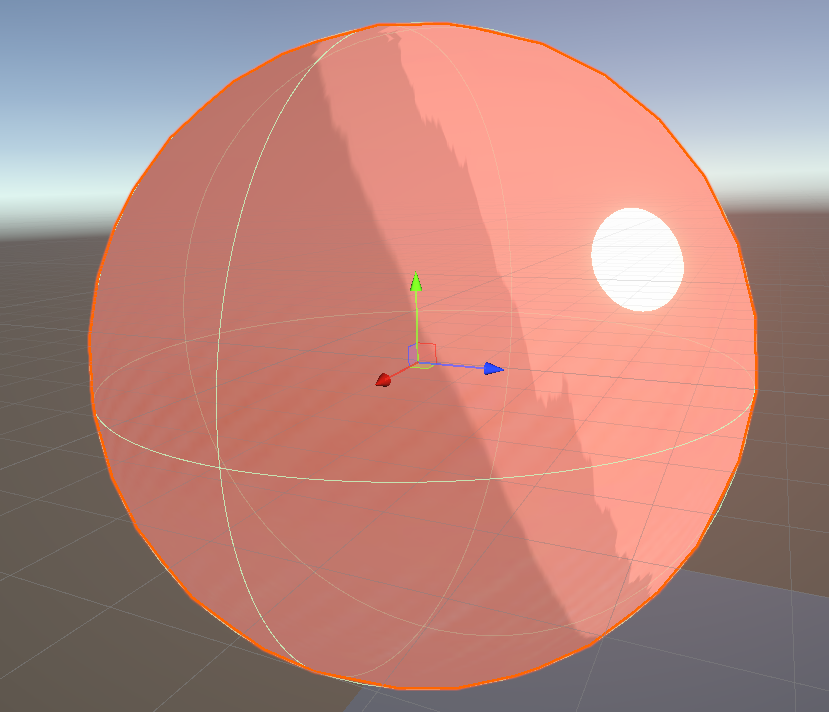
这步在计算完diffuse之后进行,先将计算好的Lambert,用噪波进行扰乱,再使用扰乱过的lambert作为UV来采样映射生成阴影。
#if USED_SHAODWRAMP

float rampValue = Lambert;

  #if RAMP_NOISE

  rampValue +=ShadowNoiseMap.x * _NoiseLevel * rampValue;//###用ranmpvalume相加后 白色的部分会直接全白 阴影交界的部分会随着噪波有一定变化以此实现只有边缘交接有噪波效果

  #endif

float Ramp = SAMPLE_TEXTURE2D(_ShadowRamp, sampler_ShadowRamp, float2(saturate(rampValue),0.01) * _ShadowRamp_ST.xy + _ShadowRamp_ST.zw).x;//因为不知道为什么 要做一次偏移

FinalRamp = saturate(Ramp);
#endif
各向异性头发
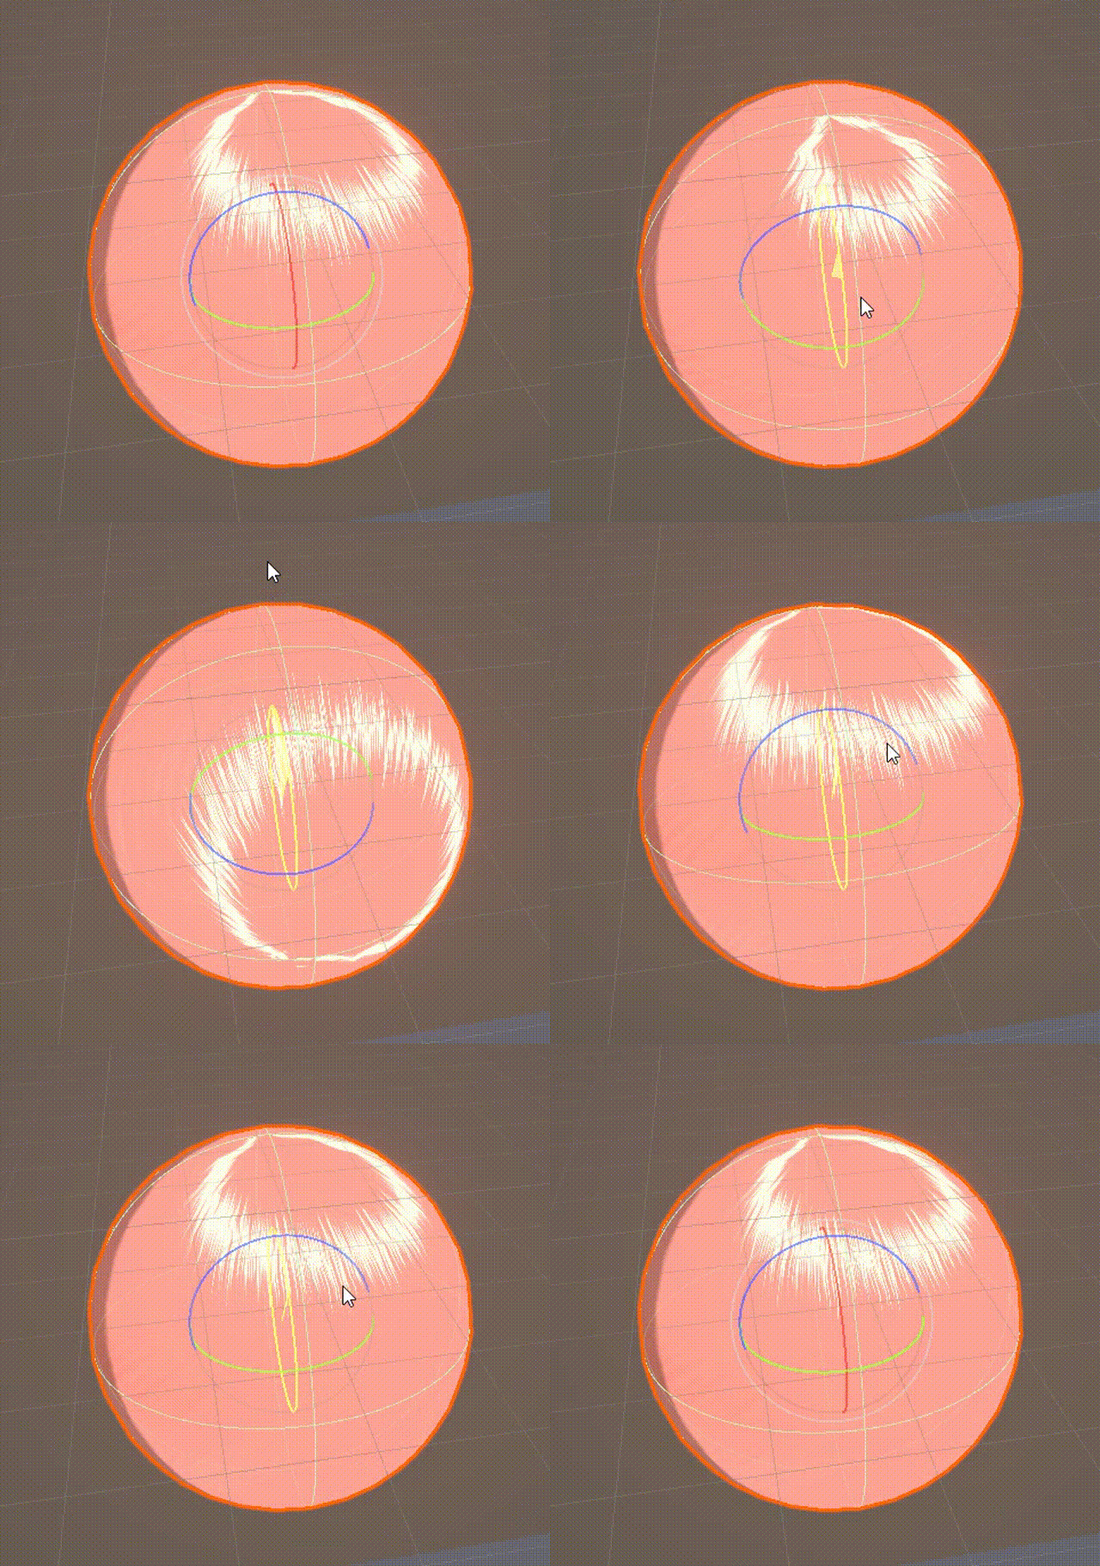
看了一遍Unitedtokyo2018米哈游的文档,其中有提及这个的具体做法,就照样搬了过来。但他们的高光分了两层,一层高频,一层低频。 最后两者相加,会在球面上形成很好看的过渡效果。而我为了偷懒只做了一层。
首先是各项异性的高光算法,这个算法会再头发上生成一个基本的各项异性高光。
float StrandSpecular(float3 T, float3 V, float3 L, float exponent, float strength)//头发各向异性
        {
            float3 H = normalize(L+V);
            float dotTH = dot(T,L);
            float sinTH = sqrt(1.0-dotTH*dotTH);
            float dirAtten = smoothstep(-1.0 , 0.0, dotTH);
            return dirAtten * pow(sinTH , exponent)  * strength;

        }
这边最后的strength用来控制高光的大小,exponent来控制高光宽度。另外值得一说的就是,由于Unity坐标系的关系,切线的数据需要换成副切线。 现在高光的区域有了,需要给高光增加抖动。
float3 ShitftTanget(float3 T,float3 N, float shift)
        {
            float3 shiftT = T + shift * N;
            return normalize(shiftT);
        }
Shift指定输出了拉扯的大小,这个变量用于控制抖动的大小,实现头发上的质感。最终将这个结果代替原有的高光,就实现了各向异性的效果。
描边
为了解决再场景比例缩放而导致的描边粗细变化的问题,使用了再NDC(归一化的设备空间?)这个方法。原理上就是用摄像机投影矩阵,将观察空间下的 法线转换为NDC空间中的法线,通过设备空间下的法线长度信息来控制描边的宽度。当然还有屏幕长宽比造成的描边不均匀问题,需要计算屏幕长宽比来 解决 代码。
float3 normalOS = normal;
float3 normalVS = normalize(mul((float3x3)UNITY_MATRIX_IT_MV, normal));
float3 ndcNormal= normalize(mul((float3x3)UNITY_MATRIX_P,normalVS).xyz);
float4 nearUpperRight = mul(unity_CameraInvProjection, float4(1, 1, UNITY_NEAR_CLIP_VALUE, _ProjectionParams.y));//摄像机投影矩阵的逆矩阵和近裁切
float aspect = abs(nearUpperRight.y / nearUpperRight.x);//计算屏幕的长宽比
ndcNormal.x *= aspect;
positionCS.xy += (0.01 * _Outlinewidth  * positionCS.w) * ndcNormal.xy;
菲涅尔
菲涅尔是物体边缘光的一种算法,在各类卡通渲染中,常用于模拟物体边缘会渗透出来一些光的现象。
float Fresnel = 1.0 - saturate(dot(viewDir,worldNormal));
float FresnelRange = smoothstep(_FMin,_FMax,Fresnel);
float3 FinalFresnel = FresnelRange * _FColor.xyz;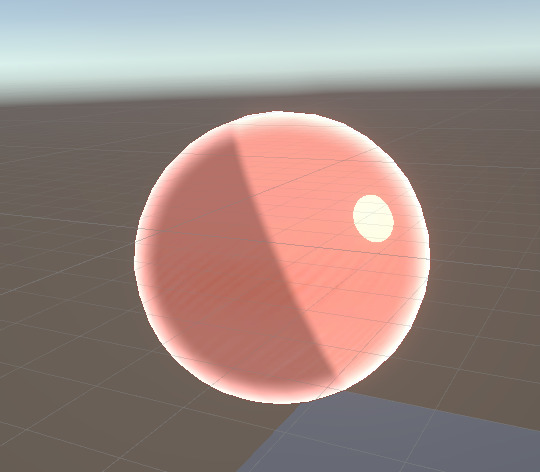 原理上是V*N最后用smoothstep来调节范围
头发的投影
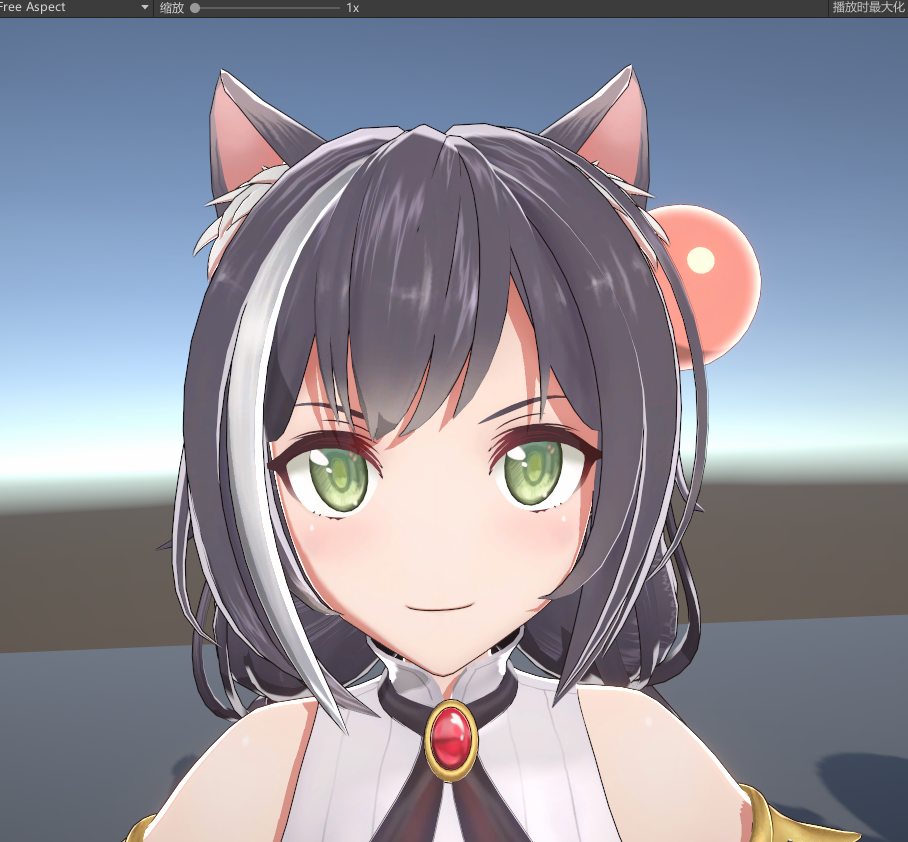
这是至今为止也没太搞明白的一个部分,利用头发和脸部的深度信息来做偏移,来获取投影到脸部的阴影区域。
首先需要创建两个Layer,一个头发层,和一个需要投影阴影的脸或者其他。然后需要一个RenderFeature。 RenderFeature,是一个URP对外的Pass扩展接口,可以介入渲染管线中间来做一些操作。 大概是下面这样,查阅了些资料,理解写在注释里了
using UnityEngine;
using UnityEngine.Rendering;
using UnityEngine.Rendering.Universal;

public class CelHairShadow : ScriptableRendererFeature//把这个大pass加进renderer
{
    [System.Serializable]
    public class Setting
    {
        public RenderPassEvent passEvent = RenderPassEvent.BeforeRenderingOpaques;
        public LayerMask hairLayer;
        public LayerMask faceLayer;
        [Range(1000, 5000)]
        public int queueMin = 2000;

        [Range(1000, 5000)]
        public int queueMax = 3000;
        public Material material;

    }//系统序列化显示的设置项Setting
    public Setting setting = new Setting();//实例化设置类型
    class CustomRenderPass : ScriptableRenderPass//定义自定义渲染使用的pass  ScriptableRenderPass 也是实际的渲染工作在这里
    {
        public int soildColorID = 0;
        public ShaderTagId shaderTag = new ShaderTagId("UniversalForward");
        public Setting setting;//需要用到的数据

        FilteringSettings filtering;
        FilteringSettings filtering2;//一个过滤器,更直白来说,它可以帮助我们选择我们想要渲染的物体,
        public CustomRenderPass(Setting setting)//构造方法 对象初始化自动执行
        {
            this.setting = setting;

            RenderQueueRange queue = new RenderQueueRange();
            queue.lowerBound = Mathf.Min(setting.queueMax, setting.queueMin);
            queue.upperBound = Mathf.Max(setting.queueMax, setting.queueMin);
            filtering = new FilteringSettings(queue, setting.hairLayer);
            filtering2 = new FilteringSettings(queue, setting.faceLayer);//过滤出对应layer下的物体
        }

        public override void Configure(CommandBuffer cmd, RenderTextureDescriptor cameraTextureDescriptor)
        {
            ////在执行渲染过程之前,Renderer 将调用此方法。如果需要配置渲染目标及其清除状态,并创建临时渲染目标纹理,
            //那就要重写这个方法。如果渲染过程未重写这个方法,则该渲染过程将渲染到激活状态下 Camera 的渲染目标。
            //get a ID
            int temp = Shader.PropertyToID("_HairSoildColor");//查找现有shader中的ID_HairSoildColor
            //use the same settings as the camera texture
            RenderTextureDescriptor desc = cameraTextureDescriptor;//创建渲染目标纹理
            cmd.GetTemporaryRT(temp, desc);//把纹理放进目标ID_HairSoildColor 当在Shader中声明时调用
            soildColorID = temp;
            //set the RT as Render Target
            ConfigureTarget(temp);
            //clear the RT
            ConfigureClear(ClearFlag.All, Color.black);//释放


        }

        public override void Execute(ScriptableRenderContext context, ref RenderingData renderingData)
        {
            /*
            var draw1 = CreateDrawingSettings(shaderTag, ref renderingData, renderingData.cameraData.defaultOpaqueSortFlags);
            draw1.overrideMaterial = setting.material;
            draw1.overrideMaterialPassIndex = 1;
            context.DrawRenderers(renderingData.cullResults, ref draw1, ref filtering2);*/
// 是这个类的核心方法,定义我们的执行规则;包含渲染逻辑,设置渲染状态,绘制渲染器或绘制程序网格,调度计算等等。 就是我们需要干什么
            var draw2 = CreateDrawingSettings(shaderTag, ref renderingData, renderingData.cameraData.defaultOpaqueSortFlags);
            draw2.overrideMaterial = setting.material;
            draw2.overrideMaterialPassIndex = 0;
            context.DrawRenderers(renderingData.cullResults, ref draw2, ref filtering);//绘制
            //这里的核心方法就是渲染使用材质输出的结果

        }


        public override void FrameCleanup(CommandBuffer cmd)
        {
                //可用于释放通过此过程创建的分配资源。完成渲染相机后调用。就可以使用此回调释放此渲染过程创建的所有资源。
        }
    }

    CustomRenderPass m_ScriptablePass;

    public override void Create()//初始化这话RenderFeature
    {
        m_ScriptablePass = new CustomRenderPass(setting);

        m_ScriptablePass.renderPassEvent = setting.passEvent;//设置了setting中使用的渲染队列
    }


    public override void AddRenderPasses(ScriptableRenderer renderer, ref RenderingData renderingData)//在Renderer中插入一个或多个 ScriptableRenderPass,对这个 Renderer 每个摄像机都设置一次
    {
        renderer.EnqueuePass(m_ScriptablePass);
    }
}
然后时对应渲染其中目标纹理的shader
Shader "Kailu/HairShadowSoild"
{
    SubShader
    {
        Tags { "RenderType" = "Opaque" "RenderPipeline" = "UniversalRenderPipeline" }

        HLSLINCLUDE
        #include "Packages/com.unity.render-pipelines.universal/ShaderLibrary/Core.hlsl"

        CBUFFER_START(UnityPerMaterial)
        float4 _BaseColor;
        CBUFFER_END
        ENDHLSL

        Pass//渲染头发深度
        {
            Name "HairSimpleColor"
            Tags { "LightMode" = "UniversalForward" }

            Cull Off
            ZTest LEqual
            ZWrite On

            HLSLPROGRAM

            #pragma vertex vert
            #pragma fragment frag

            struct a2v
            {
                float4 positionOS: POSITION;
                float4 color: COLOR;
            };

            struct v2f
            {
                float4 positionCS: SV_POSITION;
                float4 color: COLOR;
            };


            v2f vert(a2v v)
            {
                v2f o;

                VertexPositionInputs positionInputs = GetVertexPositionInputs(v.positionOS.xyz);
                o.positionCS = positionInputs.positionCS;
                o.color = v.color;//顶点颜色
                return o;
            }

            half4 frag(v2f i): SV_Target
            {
                //In DirectX, z/w from [0, 1], and use reversed Z
                //So, it means we aren't adapt the sample for OpenGL platform
                float depth = (i.positionCS.z / i.positionCS.w);
                return float4(0, depth, 0, 1);//渲染深度
            }
            ENDHLSL

        }

        Pass//被投影目标深度
        {
            Name "FaceDepthOnly"
            Tags { "LightMode" = "UniversalForward" }

            ColorMask 0
            ZTest LEqual
            ZWrite On

            HLSLPROGRAM

            #pragma vertex vert
            #pragma fragment frag

            struct a2v
            {
                float4 positionOS: POSITION;
            };

            struct v2f
            {
                float4 positionCS: SV_POSITION;
            };


            v2f vert(a2v v)
            {
                v2f o;

                o.positionCS = TransformObjectToHClip(v.positionOS.xyz);
                return o;
            }

            half4 frag(v2f i): SV_Target
            {
                return(0, 0, 0, 1);//返回黑色
            }
            ENDHLSL

        }
    }
}
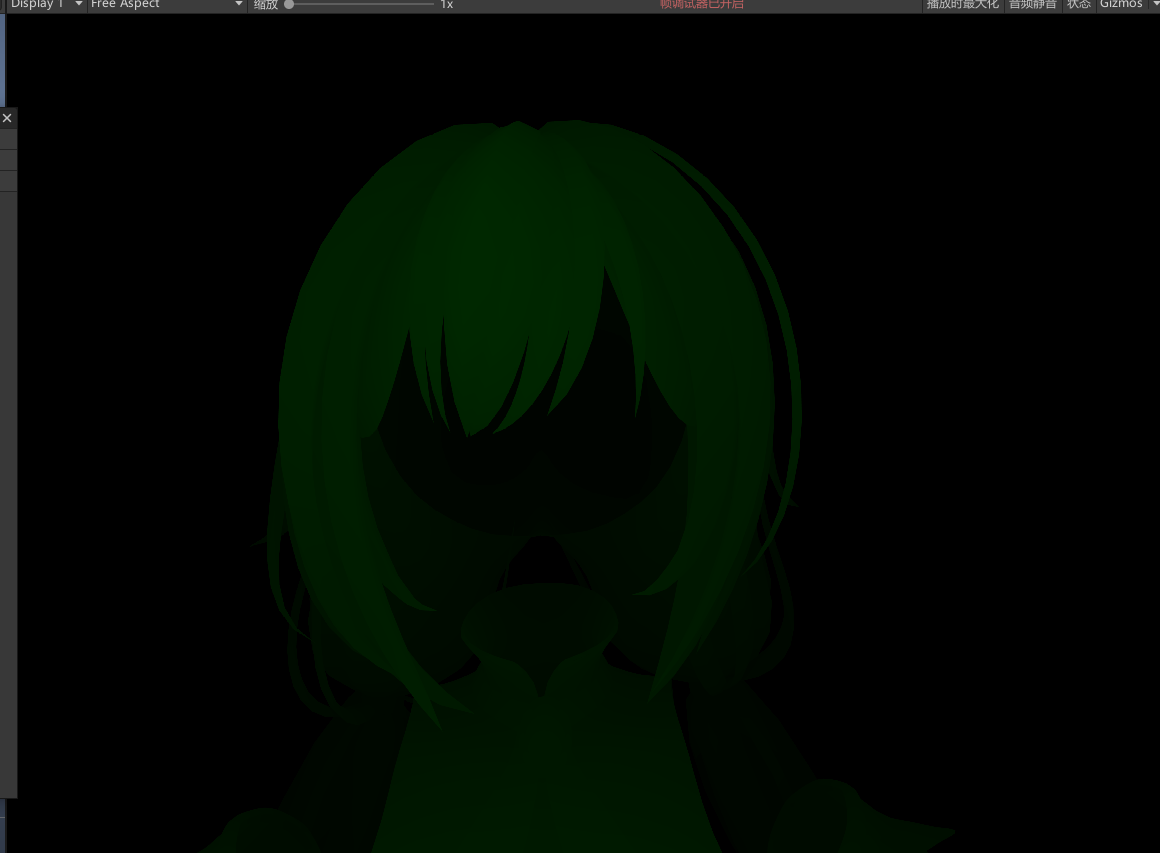
这里的主要作用就是把头发的深度信息出入到_HairSoildColor上,以便在主材质着色器中进行调用。再与要渲染的mesh进行深度对比, 从而生成投影的阴影遮罩,再进行偏移,作为阴影呈现。
最后渲染如来的头发的深度如下
最后在主材质的shader中写入
 #if IS_FACE

    float heightCorrect = smoothstep(_HeightCorrectMax, _HeightCorrectMin, i.positionWS.y);

     //In DirectX, z/w from [0, 1], and use reversed Z
    //So, it means we aren't adapt the sample for OpenGL platform
    float depth = (i.positionCS.z / i.positionCS.w);

    //get linearEyeDepth which we can using easily
    float linearEyeDepth = LinearEyeDepth(depth, _ZBufferParams);
    float2 scrPos = i.positionSS.xy / i.positionSS.w;

    //"min(1, 5/linearEyeDepth)" is a curve to adjust viewLightDir.length by distance
    float3 viewLightDir = normalize(TransformWorldToViewDir(light.direction)) * (1 / min(i.posNDCw, 1)) * min(1, 5 / linearEyeDepth) /** heightCorrect*/;

     //get the final sample point
    float2 samplingPoint = scrPos + _HairShadowDistance * viewLightDir.xy;

    float hairDepth = SAMPLE_TEXTURE2D(_HairSoildColor, sampler_HairSoildColor, samplingPoint).g;//调用头发固态纹理ID
    hairDepth = LinearEyeDepth(hairDepth, _ZBufferParams);

     //0.01 is bias
    float depthContrast = linearEyeDepth  > hairDepth * heightCorrect - 0.01 ? 0: 1; //头发深度和现有深度做对比

    #if USED_SHAODWRAMP
    FinalRamp *= depthContrast;
    #else
        Lambert *= depthContrast;
     #endif

#endif以上就是头发阴影的全部了最终的主shader所有代码如下
Shader "Kailu/KailuFukuShader"
{
    Properties
    {
    	[Header(MainTexture)]
    	[Space(10)]
        _MainTex ("MainTex", 2D) = "white" {}
        [HDR]_MainColor("MainColor",Color) = (1,1,1,1)

        [Header(Shadow)]
        [Space(10)]
        _ShadowColor("ShadowColor", Color) = (0.7,0.7,0.7,0.7)
        _ShadowRange("ShadowRange", Range(0,2)) = 0.4
        _ShadowSmooth("ShadowSmooth",Range(0,1)) = 0.2
        [Toggle(USED_SHAODWRAMP)] _EnableShaodwRamp("Enable Shadow Ramp",float) = 0
        _ShadowRamp("Shadow Ramp",2D) = "white" {}
        [Toggle(RAMP_NOISE)]_EnableShaodwNoise("Enable Shadow Noise",float) = 0
        _ShadowNoiseMap("Shadow Noise Map",2D) = "white" {}
        _NoiseLevel("Noise Level", Range(0,3)) = 1
        [Header(HairToFaceShadow)]
        [Toggle(IS_FACE)] _IsFace("isFace",Float) = 0
        _HairShadowDistance("HairShadowDistance",Float) = 1
        [Header(heightCorrectMask)]
        _HeightCorrectMax ("HeightCorrectMax", float) = 1.6
        _HeightCorrectMin ("HeightCorrectMin", float) = 1.51

        [Header(Specular)]
        [Space(10)]
        [HDR]_Specular("SpecularColor",Color) = (1.0,1.0,1.0,1.0)
        _Gloss("Gloss",Range(1.0,512)) = 20
        _SpecularSmooth("Specular Smooth",Range(0,2)) = 0.1
        _SpecularRange("Specular Range",Range(0,1)) = 0
        [Space(15)]
        [Toggle(USED_ANISOTROPIC)] _EnableAnisotropic("Enable Anisotropic",float) = 0
        //[HDR]_Specular2T("SpecularColor2T",Color) = (1.0,1.0,1.0,1.0)
        //_Specular2TRange("Specular2T Range",Range(0,1)) = 0.2
        //_Specular2TSmooth("Specular2T Smooth",Range(0,1)) = 0.2
        [Space(15)]

        _JitterMap("Jitter Map",2D) = "white" {}
        _Exponent("Exponent",Range(0,512)) = 2
        _Strength("Strength",Range(0,256)) = 2

        [Header(Outline)]
        [Space(10)]
        _Outlinewidth("Outline Width", Range(0,1)) = 0.2
        _OutlineColor("Outline Color", Color) = (0.5,0.5,0.5,1)

        [Header(Fresnel)]
        [Space(10)]
        _FMin("Fresnel Min",Range(0,1)) = 0.5
        _FMax("Fresnel Max",Range(0,1)) = 0.6
        [HDR]_FColor("Fresnel Color",Color) = (1.0,1.0,1.0,1.0)

        [Header(Bloom)]
        [Space(10)]
        _BloomPower("Bloom Power",Range(0,10)) = 1
        [HDR]_BloomColor("Bloom Color",Color) = (1.0,1.0,1.0,1.0)


    }
    SubShader
    {
        Tags { "RenderPipeline" = "UniversalPipeline" "RenderType" = "Opaque" "Queue" = "Geometry" }

        HLSLINCLUDE

        #include "Packages/com.unity.render-pipelines.universal/ShaderLibrary/Core.hlsl"
        #include "Packages/com.unity.render-pipelines.universal/ShaderLibrary/Lighting.hlsl"
        TEXTURE2D(_MainTex);           SAMPLER(sampler_MainTex);
        TEXTURE2D(_ShadowRamp);        SAMPLER(sampler_ShadowRamp);
        TEXTURE2D(_ShadowNoiseMap);    SAMPLER(sampler_ShadowNoiseMap);
        TEXTURE2D(_JitterMap);         SAMPLER(sampler_JitterMap);
        TEXTURE2D(_HairSoildColor);    SAMPLER(sampler_HairSoildColor);

        CBUFFER_START(UnityPerMaterial)

        float4 _MainTex_ST;
        float4 _MainColor;
        float4 _ShadowColor;
        float _ShadowRange;
        float4 _ShadowRamp_ST;
        float4 _ShadowNoiseMap_ST;
        float _NoiseLevel;
        float _Outlinewidth;
        float4 _OutlineColor;
        float _ShadowSmooth;
        float4 _Specular;
        float _Gloss;
        float _SpecularSmooth;
        float _SpecularRange;
        float _FMin;
        float _FMax;
        float4 _FColor;
        float _BloomPower;
        float4 _BloomColor;
        float _HeightCorrectMax;
        float _HeightCorrectMin;
        //float4 _Specular2T;
        //float _Specular2TRange;
        float _Exponent;
        float _Strength;
        //float _Specular2TSmooth;
        float4 _JitterMap_ST;
        float _HairShadowDistance;
        //Toggle
        float _EnableShaodwRamp;
        float _EnableShaodwNoise;
        float _EnableAnisotropic;


        CBUFFER_END

        struct a2v
        {
            float4 positionOS : POSITION;
            float3 normalOS : NORMAL;
            float4 tangentOS : TANGENT;
            float2 uv : TEXCOORD0;
        };

        struct v2f
        {
            float4 positionCS : SV_POSITION;
            float2 uv : TEXCOORD0;
            float3 positionWS : TEXCOORD1;
            float3 positionVS : TEXCOORD2;
            float3 normalWS : TEXCOORD3;
            float3 tangentWS : TEXCOORD4;
            float3 BittangentWS : TEXCOORD5;

            #if IS_FACE
                    float4 positionSS: TEXCOORD6;
                    float posNDCw: TEXCOORD7;
            #endif
        };

        float3 ShitftTanget(float3 T,float3 N, float shift)
        {
            float3 shiftT = T + shift * N;
            return normalize(shiftT);
        }

        float StrandSpecular(float3 T, float3 V, float3 L, float exponent, float strength)//头发各向异性
        {
            float3 H = normalize(L+V);
            float dotTH = dot(T,L);
            float sinTH = sqrt(1.0-dotTH*dotTH);
            float dirAtten = smoothstep(-1.0 , 0.0, dotTH);
            return dirAtten * pow(sinTH , exponent)  * strength;

        }

        ENDHLSL

        Pass
        {
            Cull Back
            Name "BASE_COLOR_PASS"
            Tags{"LightMode" = "UniversalForward"}


            HLSLPROGRAM

            #pragma vertex vert
            #pragma fragment frag

            #pragma multi_compile _ _MAIN_LIGHT_SHADOWS//想让物体接收其他着色器的阴影,需要声明此关键字  Lighting.hlsl
            #pragma multi_compile _ _MAIN_LIGHT_SHADOWS_CASCADE
            #pragma multi_compile _ _ADDITIONAL_LIGHTS_VERTEX _ADDITIONAL_LIGHTS
            #pragma multi_compile_fragment _ _ADDITIONAL_LIGHT_SHADOWS
            #pragma multi_compile_fragment _ _SHADOWS_SOFT
            #pragma multi_compile_fog

            #pragma shader_feature_local_fragment RAMP_NOISE
            #pragma shader_feature_local_fragment USED_SHAODWRAMP
            #pragma shader_feature_local_fragment USED_ANISOTROPIC
            #pragma shader_feature IS_FACE
            //#pragma shader_feature_local_fragment ENABLE_FACE_SHADOW_MAP
            //#pragma shader_feature_local_fragment ENABLE_RAMP_SHADOW

            v2f vert(a2v v)
            {
                v2f o;
                VertexPositionInputs positionInputs = GetVertexPositionInputs(v.positionOS.xyz);
                o.positionCS = positionInputs.positionCS;
                o.positionWS = positionInputs.positionWS;

                VertexNormalInputs tbn = GetVertexNormalInputs(v.normalOS,v.tangentOS);
                o.normalWS = tbn.normalWS;
                o.tangentWS = tbn.tangentWS;
                o.BittangentWS = tbn.bitangentWS;
                o.uv = v.uv;

                #if IS_FACE
                    o.posNDCw = positionInputs.positionNDC.w;
                    o.positionSS = ComputeScreenPos(positionInputs.positionCS);
                #endif

                return o ;
            }


            float4 frag(v2f i) : SV_TARGET
            {
                float3 worldPos = i.positionWS;
                float3 viewPos = i.positionVS;
                float3 worldNormal = normalize(i.normalWS);
                float3 worldTangent = normalize(i.tangentWS);
                float3 worldBittangent = normalize(i.BittangentWS);


                float4 shadowCoords = TransformWorldToShadowCoord(worldPos.xyz);
                Light light = GetMainLight(shadowCoords);

                float3 viewDir = normalize(_WorldSpaceCameraPos.xyz - worldPos);

                float3 lightDirWS = normalize(light.direction);
                float3 ShadowColor = light.shadowAttenuation + _ShadowColor.xyz;

                float4 MainTexture = SAMPLE_TEXTURE2D(_MainTex, sampler_MainTex, i.uv);
                //float4 shadowRampMap = SAMPLE_TEXTURE2D(_ShadowRamp,sampler_ShadowRamp);
                float4 ShadowNoiseMap = SAMPLE_TEXTURE2D(_ShadowNoiseMap, sampler_ShadowNoiseMap,  i.uv * _ShadowNoiseMap_ST.xy + _ShadowNoiseMap_ST.zw);

                float halfLambert = 0.5 * dot(worldNormal , lightDirWS) + 0.5;
                float Lambert = smoothstep(0, _ShadowSmooth, halfLambert - _ShadowRange);
                float FinalRamp = 1.0;

                #if USED_SHAODWRAMP

                float rampValue = Lambert;

                    #if RAMP_NOISE

                    rampValue +=ShadowNoiseMap.x * _NoiseLevel * rampValue;//###用ranmpvalume相加后 白色的部分会直接全白 阴影交界的部分会随着噪波有一定变化 以此实现只有边缘交接有噪波效果

                    #endif

                float Ramp = SAMPLE_TEXTURE2D(_ShadowRamp, sampler_ShadowRamp, float2(saturate(rampValue),0.01) * _ShadowRamp_ST.xy + _ShadowRamp_ST.zw).x;//因为不知道为什么 要做一次偏移

                FinalRamp = saturate(Ramp);

                #endif

                #if IS_FACE

                    float heightCorrect = smoothstep(_HeightCorrectMax, _HeightCorrectMin, i.positionWS.y);

                    //In DirectX, z/w from [0, 1], and use reversed Z
                    //So, it means we aren't adapt the sample for OpenGL platform
                    float depth = (i.positionCS.z / i.positionCS.w);

                    //get linearEyeDepth which we can using easily
                    float linearEyeDepth = LinearEyeDepth(depth, _ZBufferParams);
                    float2 scrPos = i.positionSS.xy / i.positionSS.w;

                    //"min(1, 5/linearEyeDepth)" is a curve to adjust viewLightDir.length by distance
                    float3 viewLightDir = normalize(TransformWorldToViewDir(light.direction)) * (1 / min(i.posNDCw, 1)) * min(1, 5 / linearEyeDepth) /** heightCorrect*/;

                    //get the final sample point
                    float2 samplingPoint = scrPos + _HairShadowDistance * viewLightDir.xy;

                    float hairDepth = SAMPLE_TEXTURE2D(_HairSoildColor, sampler_HairSoildColor, samplingPoint).g;//调用头发固态纹理ID
                    hairDepth = LinearEyeDepth(hairDepth, _ZBufferParams);

                    //0.01 is bias
                    float depthContrast = linearEyeDepth  > hairDepth * heightCorrect - 0.01 ? 0: 1; //头发深度和现有深度做对比

                    #if USED_SHAODWRAMP
                    FinalRamp *= depthContrast;
                    #else
                    Lambert *= depthContrast;
                    #endif

                #endif

                float3 diffuse = lerp(MainTexture.xyz * _ShadowColor.xyz, MainTexture.xyz, Lambert);

                #if USED_SHAODWRAMP

                diffuse = lerp(MainTexture.xyz * _ShadowColor.xyz, MainTexture.xyz, FinalRamp);

                #endif

                //Spec
                float3 HalfViewDir = normalize(viewDir + lightDirWS.xyz);
                float3 Specular1st =pow(max(0,dot(worldNormal,HalfViewDir)),_Gloss);
                float3 Specular = smoothstep(0,_SpecularSmooth,Specular1st-_SpecularRange) * MainTexture.xyz;

                #if USED_ANISOTROPIC

                    //float3 Specular2T = smoothstep(0, _Specular2TSmooth,Specular1st - _Specular2TRange) * _Specular2T.xyz;
                    float4 JitterMap = SAMPLE_TEXTURE2D(_JitterMap,sampler_JitterMap, i.uv * _JitterMap_ST.xy + _JitterMap_ST.zw);
                    worldBittangent = ShitftTanget(worldBittangent,worldNormal,JitterMap.x);
                    float JitterSpecular = StrandSpecular(worldBittangent,viewDir ,lightDirWS ,_Exponent,_Strength);
                    Specular = saturate( JitterSpecular * Lambert)* MainTexture.xyz * _Specular;

                #endif

                float Fresnel =  1.0 - saturate(dot(viewDir,worldNormal));
                float FresnelRange = smoothstep(_FMin,_FMax,Fresnel);
                float3 FinalFresnel = FresnelRange * _FColor.xyz;

                float BloomRange = FinalFresnel.x + Specular.x;
                float3 Bloom = BloomRange * _BloomPower * _MainLightColor.xyz *  _BloomColor.xyz * MainTexture.xyz;


                float3 FinalColor = (diffuse * _MainColor.xyz + Specular *  _Specular.xyz  + FinalFresnel * _MainColor.xyz) * _MainLightColor.xyz + Bloom;
                //float3 FinalColor =FinalRamp.xxx;

                return float4(FinalColor,1);


            }
            ENDHLSL


        }

        Pass
        {
            Cull Front
            Name "Outline"
            //Tags{}

            HLSLPROGRAM

            #pragma vertex vertOutline
            #pragma fragment fragOutline


            float4 vertOutline(float4 positionOS : POSITION , float3 normal : NORMAL , float3 tangent : TANGENT) : SV_POSITION
            {
                VertexPositionInputs positionInputs = GetVertexPositionInputs(positionOS.xyz);
                float4 positionCS = positionInputs.positionCS;
                VertexNormalInputs tbn = GetVertexNormalInputs(normal);
                float3 normalWS = tbn.normalWS;
                float3 normalOS = normal;
                float3 normalVS = normalize(mul((float3x3)UNITY_MATRIX_IT_MV, normal));
                float3 ndcNormal= normalize(mul((float3x3)UNITY_MATRIX_P,normalVS).xyz);
                float4 nearUpperRight = mul(unity_CameraInvProjection, float4(1, 1, UNITY_NEAR_CLIP_VALUE, _ProjectionParams.y));//摄像机投影矩阵的逆矩阵和近裁切
                float aspect = abs(nearUpperRight.y / nearUpperRight.x);//计算屏幕的长宽比
                ndcNormal.x *= aspect;
                positionCS.xy += (0.01 * _Outlinewidth  * positionCS.w) * ndcNormal.xy;
                return positionCS;
            }

            float4 fragOutline(a2v i) : COLOR
            {
                float4 MainTexture = SAMPLE_TEXTURE2D(_MainTex, sampler_MainTex, i.uv);
                float3 OutlineColor = _OutlineColor.xyz * MainTexture.xyz;
                return float4(OutlineColor,1);
            }
            ENDHLSL


        }

        UsePass "Universal Render Pipeline/Lit/ShadowCaster"
    }

}
最后由于最开始的初衷是因为原神的卡通渲染实在是太秀了,也一并研究了一下他们的卡通材质, 主要是使用阈值来实现脸部的阴影过渡,光照贴图来区分身上不同材质的高光,用了很多层RAMP 图来实现身上阴影过渡在不同环境中的变化。 最后参照着一些资料,写出了个大概的shader。 备份保存在这里https://github.com/AfterDuang/ToonRenderingLearn2021_1
Ref:
- https://zhuanlan.zhihu.com/p/232450616
- https://zhuanlan.zhihu.com/p/111633226
- https://zhuanlan.zhihu.com/p/98948117
- Unitetokyo2018-mihoyo Technical Director
- https://www.freesion.com/article/3303259541/
- https://docs.unity3d.com/Packages/com.unity.render-pipelines.universal@12.0/manual/urp-renderer-feature.html
- https://docs.unity.cn/cn/2021.1/Manual/scriptable-render-pipeline-introduction.html
- https://docs.unity3d.com/ScriptReference/Rendering.ScriptableRenderContext.html
- https://zhuanlan.zhihu.com/p/373273390
- https://zhuanlan.zhihu.com/p/272495627
- https://zhuanlan.zhihu.com/p/360229590